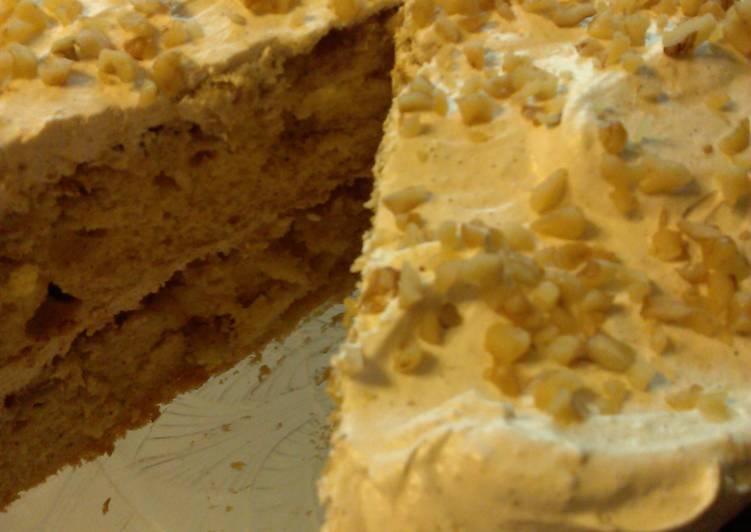
Hello everybody, I hope you’re having an incredible day today. Today, we’re going to make a special dish, red velvet cuppies with chocolate coated berries #anniversary. It is one of my favorites. For mine, I will make it a bit unique. This will be really delicious.
Red Velvet Cuppies With Chocolate Coated Berries #anniversary is one of the most favored of current trending foods on earth. It is easy, it is quick, it tastes yummy. It’s appreciated by millions daily. They are nice and they look wonderful. Red Velvet Cuppies With Chocolate Coated Berries #anniversary is something that I have loved my entire life.
Okay, okay… our love affair with Red The nice thing about these cookies are how simple they are to make!! Red Velvet Cookies with White Chocolate Chunks. Red velvet cake meets a soft-baked chocolate chip cookie today.
To get started with this recipe, we must first prepare a few ingredients. You can cook red velvet cuppies with chocolate coated berries #anniversary using 15 ingredients and 10 steps. Here is how you cook it.
The ingredients needed to make Red Velvet Cuppies With Chocolate Coated Berries #anniversary:
- Get 1 1/2 cups All purpose flour
- Take 1/2 cup Cocoa powder
- Prepare Red colour 3-4 drops (i used Dr.Oetker gel food colour)
- Prepare Sugar 3/4 th cup
- Take 1 tsp Baking Powder
- Prepare 1/2 tsp Baking soda
- Make ready Eggs 3 large
- Prepare 1 tsp Vanilla essence
- Make ready 120 ml Milk
- Make ready Butter 1/2 cup melted
- Get 200 gm FOR THE CREAM CHEESE FROSTING: cream cheese
- Get 2 tbsp Powdered sugar
- Get 1 tsp Vanilla essence
- Get 1 cup FOR THE CHOCOLATE COVERED STRAWBERRIES; Strawberries
- Get Dark chocolate or semisweet one melted 1/2 cup
Plus when you use too much cocoa it depletes that beautiful red color, it turns it more of a brownish auburn shade rather than a velvety red. Whenever you want to create an easy irresistible dessert, brownies should always be on your list. When turned into red velvet brownies they really are a. Red velvet cake in cookie form—that's what you've got here with these Red Velvet Cookies!
Instructions to make Red Velvet Cuppies With Chocolate Coated Berries #anniversary:
- Whisk in the eggs first and then cream the sugar vanilla essence and butter together until fluffy.
- Meanwhile preheat the oven for a good 10 mins on 180°.
- Stir in the dry ingredients now little by little adding in the milk also. Now add the colour too. Quantity of the milk depends on the quality of the flour. It can be less or more. Do keep that in mind.
- Line the muffin pan with the cupcake liners.
- Scoop out just as much as 3/4 th of the liner because they rise as they bake.
- Bake for 25 to 30 mins or until done.
- For the cream cheese frosting, beat the cream with all the other ingredients listed in the recipe until smooth. Use of sugar depends upon your liking. Use it accordingly.
- Let the cupcakes cool down before you do the frosting.
- Melt the chocolate in a double boiler or a microwave and dip each strawberries until 3/4 th of them is covered with chocolate.
- Serve them with these wonderful berries and see your loved ones dig into these happily.
Cream cheese and white chocolate chips lend tanginess and sweetness to every bite. Homemade red velvet cupcakes covered in clouds of real chocolate frosting and topped with a chocolate heart. While, red velvet cake is usually served with cream cheese frosting, I've added a sweet, silky smooth chocolate buttercream - and trust me, it pairs beautifully. Red Velvet Chocolate Chip Cookie Recipe. Ok - let's talk cookie baking.
So that’s going to wrap it up for this special food red velvet cuppies with chocolate coated berries #anniversary recipe. Thank you very much for your time. I’m confident that you will make this at home. There’s gonna be interesting food at home recipes coming up. Don’t forget to bookmark this page in your browser, and share it to your loved ones, colleague and friends. Thank you for reading. Go on get cooking!